Why the Resting Squat Belongs in Your Gentle Movement Practice
I remember the first time I tried to sit in a resting squat during a mobility workshop. I was told to hold it for two minutes. My hips screamed, my heels lifted off the floor, and my breath turned shallow. I spent the entire time calculating how many seconds were left. That taught me something important: the resting squat is not a benchmark to endure. It’s a position to settle into — only as long as your breath stays smooth.
This article reframes the resting squat as a trauma-sensitive reset. It’s not about depth or duration. It’s about using the position to downregulate your nervous system, release tension in the hips and pelvis, and honor your body’s signals. If you’ve ever felt like deep squats were “too much” or you’re navigating joint sensitivity, this approach is for you.
We’ll cover how to use props, micro-dosing (30-second holds), and a breath-led approach that defines success as safety, not depth. Along the way, I’ll share what I’ve learned from my own mistakes, and why the thing nobody tells you about resting squats is that they can be a form of somatic meditation — if you let them.
What Is a Mobility Squat, Really?
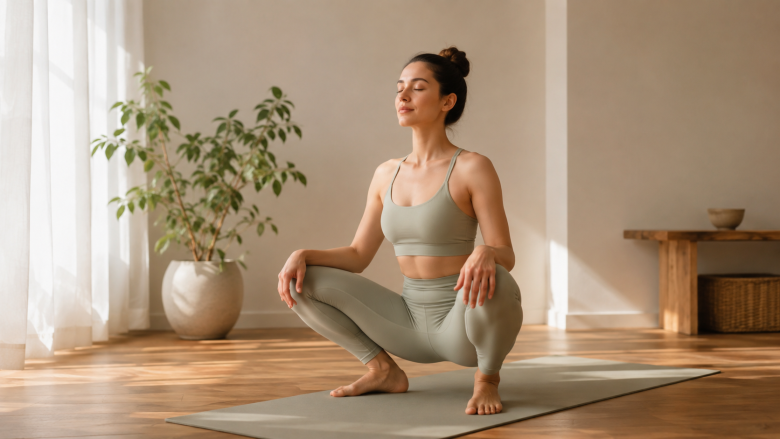
When most people search for “mobility squat,” they find videos of athletes loading barbells or coaches yelling about ankle dorsiflexion. But a mobility squat is simply the range of motion your joints allow when you lower into a squat, supported by your muscles and connective tissue. The “resting squat” — also called a deep squat, Asian squat, or primal squat — is a specific variation where you sit at the bottom of the squat, often with feet flat and torso upright, and hold the position.
In the gentle movement world, we distinguish between a mobility drill (which requires effort and repetition) and a resting position (which invites stillness and ease). The resting squat becomes a mobility squat when you approach it with awareness, not force. It’s a position you can use to assess your hips, knees, and ankles — but more importantly, to teach your nervous system that being in a deep squat is safe.
Most people don’t realize that the resting squat is not a natural position for everyone. It depends on hip socket shape, past injuries, and even what shoes you’ve worn. There’s no one-size-fits-all. That’s why the gentle movement approach starts not with a timer, but with a breath.
Is the Resting Squat Good for You? (And for Your Knees?)
Let’s address the two big questions readers often type into search bars: “Is the resting squat good for you?” and “Is resting squat good for the knees?” The answer is: it depends. It can be deeply beneficial, but only if you respect your current range of motion and pain signals.
For your overall health, the resting squat can improve hip mobility, ankle range, and spinal alignment. It also opens the pelvic floor, which can be helpful for people who sit all day. But the benefits are not automatic. If you force your knees forward past your toes without adequate ankle mobility, or if you let your lower back round, you may experience discomfort. The key is to use props like yoga blocks or a rolled towel under your heels to create a stable base. This offloads your knees and allows your hips to relax.
For knee health, the resting squat is generally safe when you don’t exceed your pain-free range. The thing nobody tells you: knees are not the limiting factor for most people — it’s the hips and ankles. When your hips are tight, your knees compensate by shifting forward. That’s why we regress the squat with heel support. If you have a history of meniscus or ligament issues, approach the position with extra caution. Always start with a chair or a low stool to support your weight. As I explain in our 30-Day Gentle Walking Challenge for Beginners, small, consistent movements build resilience without overwhelming the joints.
The Nervous System Connection: Why the Resting Squat Is a Somatic Reset
Here’s the gap that most competitors miss: the resting squat is not just a physical position. It’s a powerful tool for vagal tone and nervous system regulation. When you sit in a deep squat with a relaxed breath, you activate the parasympathetic nervous system — the “rest and digest” branch. The position itself compresses the abdomen, which can stimulate the vagus nerve and promote a sense of calm.
I’ve had clients who cried during their first 30-second resting squat. Not because of pain, but because the position unlocked a stored emotional tension. That’s the trauma-sensitive aspect. The squat can feel vulnerable — your hips are open, your torso is folded, you’re low to the ground. For some, this triggers a protective response. That’s why we don’t push. We invite.
To use the resting squat as a somatic reset, follow these steps:
- Start supported: Place two yoga blocks under your heels. If you can’t sit with feet flat, keep the blocks. There’s no shame in props.
- Set a micro-dose timer: 30 seconds max. Not two minutes. Not five. Just 30 seconds of smooth breathing.
- Close your eyes or soften your gaze: Bring attention to the sensation of your feet on the floor, your sit bones, and the gentle rise and fall of your belly.
- Breathe in for four counts, out for six: This lengthens the exhale, which activates the vagus nerve.
- If you notice discomfort, come out: The moment your breath feels strained or your jaw tightens, that’s your cue to stop. Not after. At.
This approach redefines success. You’re not trying to “get deeper” or “hold longer.” You’re simply practicing being present in a supported squat. Over time, your nervous system learns that this position is safe, and your range of motion may increase naturally — without force.
How Long Should You Sit in a Resting Squat? (The Micro-Dosing Answer)
This is the most common question I get. And the answer in the search results is always a number: two minutes, five minutes, ten minutes. But those numbers are arbitrary and often performance-oriented. The honest answer is: only as long as your breath stays smooth. Stop before discomfort, not at it.
For most people starting a gentle movement practice, I recommend micro-dosing. That means holding the resting squat for 15 to 30 seconds, multiple times a day, rather than one long hold. This respects your body’s current capacity and reduces the risk of joint strain. Here’s a simple protocol:
- Morning reset: After your morning bathroom break, sit in a supported squat for 30 seconds while you take three slow breaths.
- Post-lunch settle: After eating, use the squat to aid digestion. 20 seconds, with a focus on belly relaxation.
- Evening unwind: Before bed, a 30-second hold with a longer exhale. This can signal to your nervous system that it’s safe to rest.
If you can maintain a smooth breath for 30 seconds, you can gradually increase to 45 seconds, then 60 seconds — but only if you feel no tension. I’ve had clients who never went beyond 30 seconds, and that’s perfect. The goal is presence, not progression.
For a more structured gentle movement habit, consider pairing this with other low-impact activities. Our Energizing Morning Routine with Light Movement includes a seated hip opener that complements the resting squat beautifully.
How to Regress the Resting Squat for Sensitive Joints (Pain vs. Bliss)
There’s a difference between a “good stretch” and a “stop now” signal. The pain/bliss distinction is crucial. A blissful stretch feels like a gentle, expanding sensation — like a yawn in your hips. Pain is sharp, pinching, or burning, especially in the knees or lower back. If you feel the latter, you need to regress.
Here are three regressions that honor sensitive joints:
- Heel elevation: Place a rolled towel, yoga block, or wedge under your heels. This reduces the demand on your ankle dorsiflexion and takes pressure off your knees. Most people with knee pain find immediate relief.
- Chair support: Sit on a low stool or chair, then lower your hips just a few inches. Keep your feet flat on the floor. This is a tiny squat, but it still opens the hips. Hold for 30 seconds, then lower a bit more if it feels okay.
- Wall squat: Stand with your back against a wall, walk your feet out about a foot, then slide down until your hips are at a comfortable angle. The wall supports your spine and reduces knee load.
I once worked with a client who had chronic patellar tendinopathy. She couldn’t do a full squat without pain. We started with the wall squat, holding for 10 seconds, twice a day. After three weeks, she could sit on a low stool without knee pain. After six weeks, she tried a heel-supported full squat for 15 seconds, pain-free. The key was patience and respecting her limits.
If you experience any sharp or persistent pain during a resting squat, stop and consult a physical therapist. The resting squat is not a cure-all — it’s a tool. And like any tool, it works only when used appropriately.
Common Mistakes (And What to Do Instead)
Even with a gentle approach, it’s easy to fall into patterns that undermine the benefits. Here are three mistakes I see often, and how to avoid them:
- Mistake: Holding your breath. Many people unconsciously brace when they squat. This increases intra-abdominal pressure and sends a stress signal to the nervous system. Instead: Exhale fully as you lower into the squat. Maintain a soft, rhythmic breath throughout.
- Mistake: Gripping the floor with your toes. This indicates tension in the feet and calves, which travels up the chain. Instead: Spread your toes wide and relax the arches. Imagine your feet are melting into the floor.
- Mistake: Pushing past your edge. The “no pain, no gain” mindset has no place in gentle movement. Instead: Stay well within your comfort zone. If you feel a stretch, that’s fine. If you feel a pull or strain, back off.
These mistakes are common because we’ve been conditioned to view mobility as something to conquer. But the resting squat is not a competition. It’s a conversation with your body.
A Gentle 5-Minute Resting Squat Practice
Here’s a simple routine you can do right now. No equipment needed — just a surface to sit on and a willingness to slow down.
- Warm up (1 minute): Stand with feet hip-width apart. Slowly circle your hips in one direction, then the other. Let your knees bend slightly. Then, lift your arms overhead as you inhale, and fold forward as you exhale, letting your hands hang toward the floor.
- Supported squat (2 minutes): Place a yoga block or folded blanket under your heels. Lower into a squat. Keep your hands on your thighs or in a prayer position at your chest. Breathe slowly. Exhale longer than you inhale. If your breath shortens, come out. Repeat micro-doses of 30 seconds with a short break in between.
- Hip circles in squat (1 minute): While in the squat, draw small circles with your knees. 30 seconds clockwise, 30 seconds counterclockwise. This adds gentle movement to the joints.
- Rest (1 minute): Come out of the squat. Lie on your back with knees bent, feet flat. Place your hands on your belly. Breathe. Notice any sensations. This integration is as important as the squat itself.
That’s it. Five minutes. No timer pressure. If you only have 30 seconds, do 30 seconds. The most important thing is to show up with curiosity, not expectation.
When to Dial Back: Honest Limitations
No movement practice is universally beneficial. The resting squat has limitations, and acknowledging them builds trust with your reader. If you have any of the following conditions, be extra cautious or avoid the position altogether:
- Acute knee injury: If you have a recent meniscus tear, ACL repair, or patellar instability, avoid deep squats until cleared by a medical professional.
- Hip replacement: Many surgeons advise against deep squats post-arthroplasty because of the risk of dislocation. Check with your surgeon.
- Pregnancy: In the third trimester, the resting squat can be safe and even beneficial for preparing for birth, but always listen to your body and avoid any compression that feels wrong.
- Osteoarthritis in the hip or knee: Some people find deep squats aggravating. Heel-supported and partial squats may be better options.
If you’re unsure, start with the chair regression and stay there for weeks. There’s no rush. The gentle movement philosophy is about honoring your body’s timeline, not an external one.
Final Thoughts: Redefining Success in the Resting Squat
The resting squat is not a test of your fitness. It’s a way to connect with your body’s wisdom. When you approach it with gentle movement principles — micro-dosing, breath-led duration, props as support, and a focus on sensation over shape — you unlock a powerful tool for nervous system regulation and hip release.
I’ve had days where I couldn’t squat for more than 10 seconds. I’ve also had days where I sat in a supported squat for a full minute, feeling my hips open like a slow flower. Both are valid. Both are wins. The moment you stop measuring your success by depth or duration, the squat becomes a reset — not a rep.
If you’re new to this practice, start with 30 seconds and a block under your heels. Breathe. If your breath stays smooth, you’re doing it right. That’s the only metric that matters.